
How to configure code syntax highlighting with Prismic, Gatsby and PrismJS
Learn how to create a Prismic Slice to pass markdown to your Gatsby component which you can then highlight with PrismJS
August 04, 2022
4 mins
TABLE OF CONTENTS
Even though this is a Prismic specific tutorial, you can skip the first step and see how to integrate PrismJS syntax highlighting in Gatsby with markdown which is coming from another source.
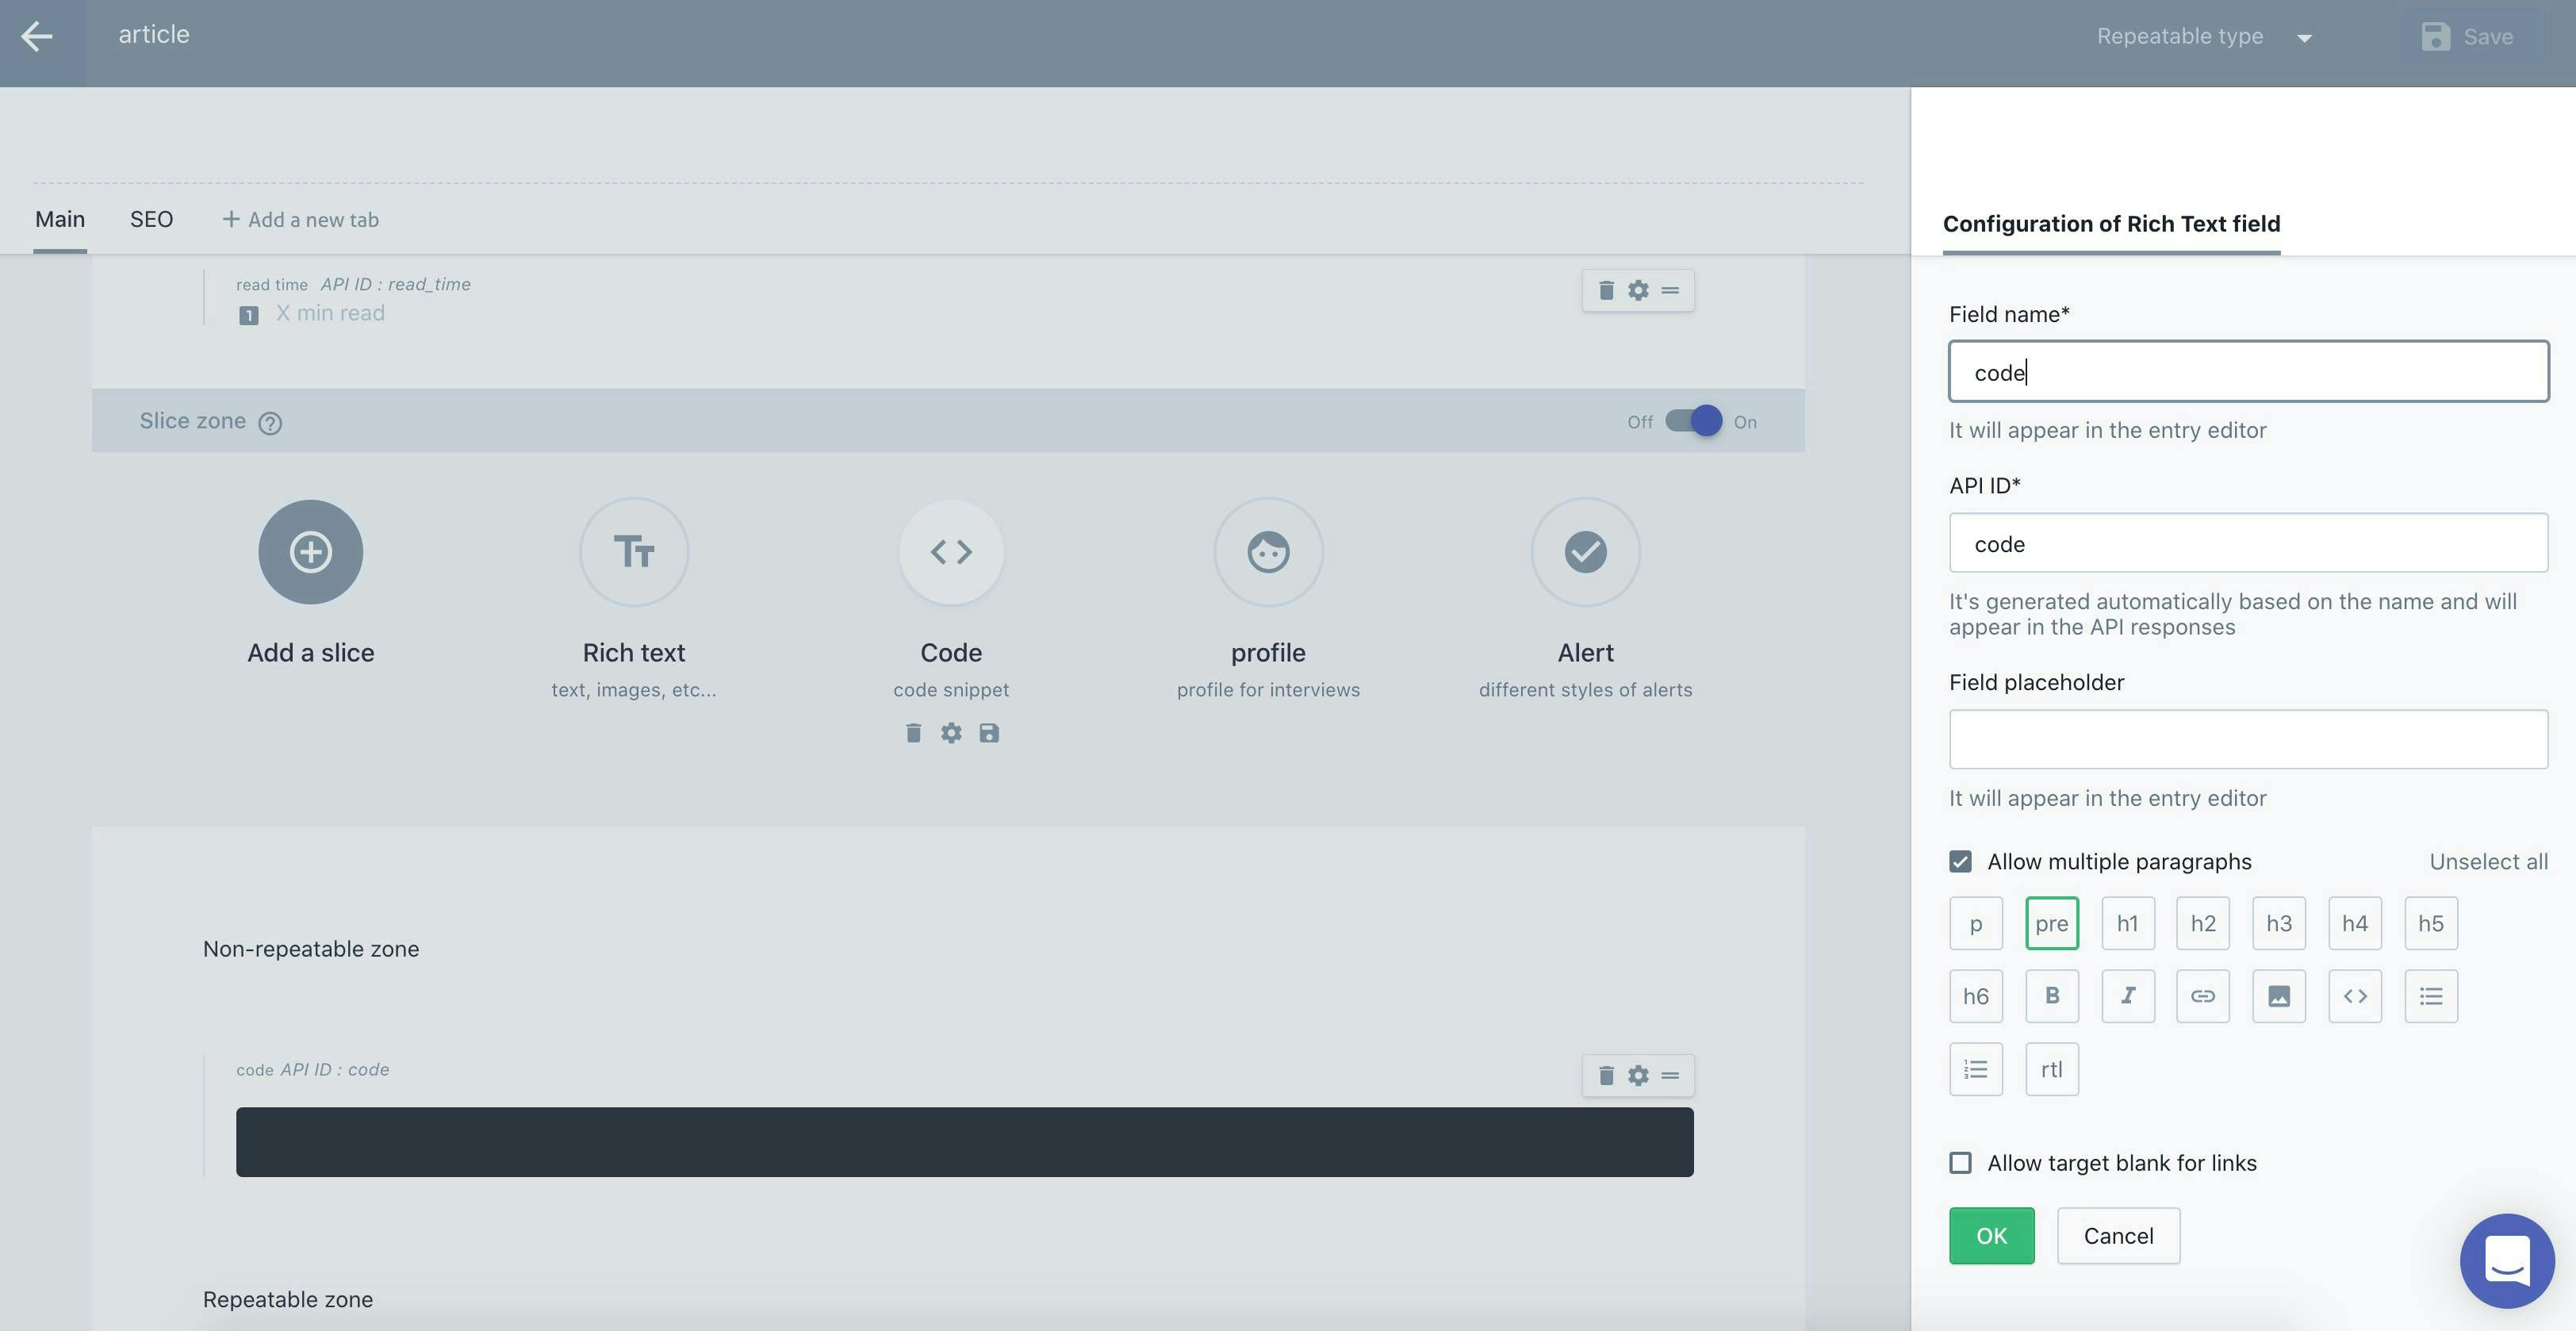
Step 1: Create a Code slice in Prismic
Create a new slice Code (I named it Code, but you can give it any name you'd like) which is used for your code snippets.
If you haven't used slices within your Prismic application before, I would highly recommend you to do so. It is a powerful feature which allows you to customise and componentize your application.
For example, for my article content type, I have several different slices - Profile for my interview articles, Alerts to highlight important information (such as warnings and info banners), Rich Text for text, images, lists, links, etc and finally - Code for, you guessed it, code snippets.
You can read more about slices and how to use them on the Prismic blog.
In order to create a new slice, go to Custom Types, select the article type, enable the Slice zone and then add a new slice called Code. Then within the slice, add a rich text field called "code" and only allow pre content.
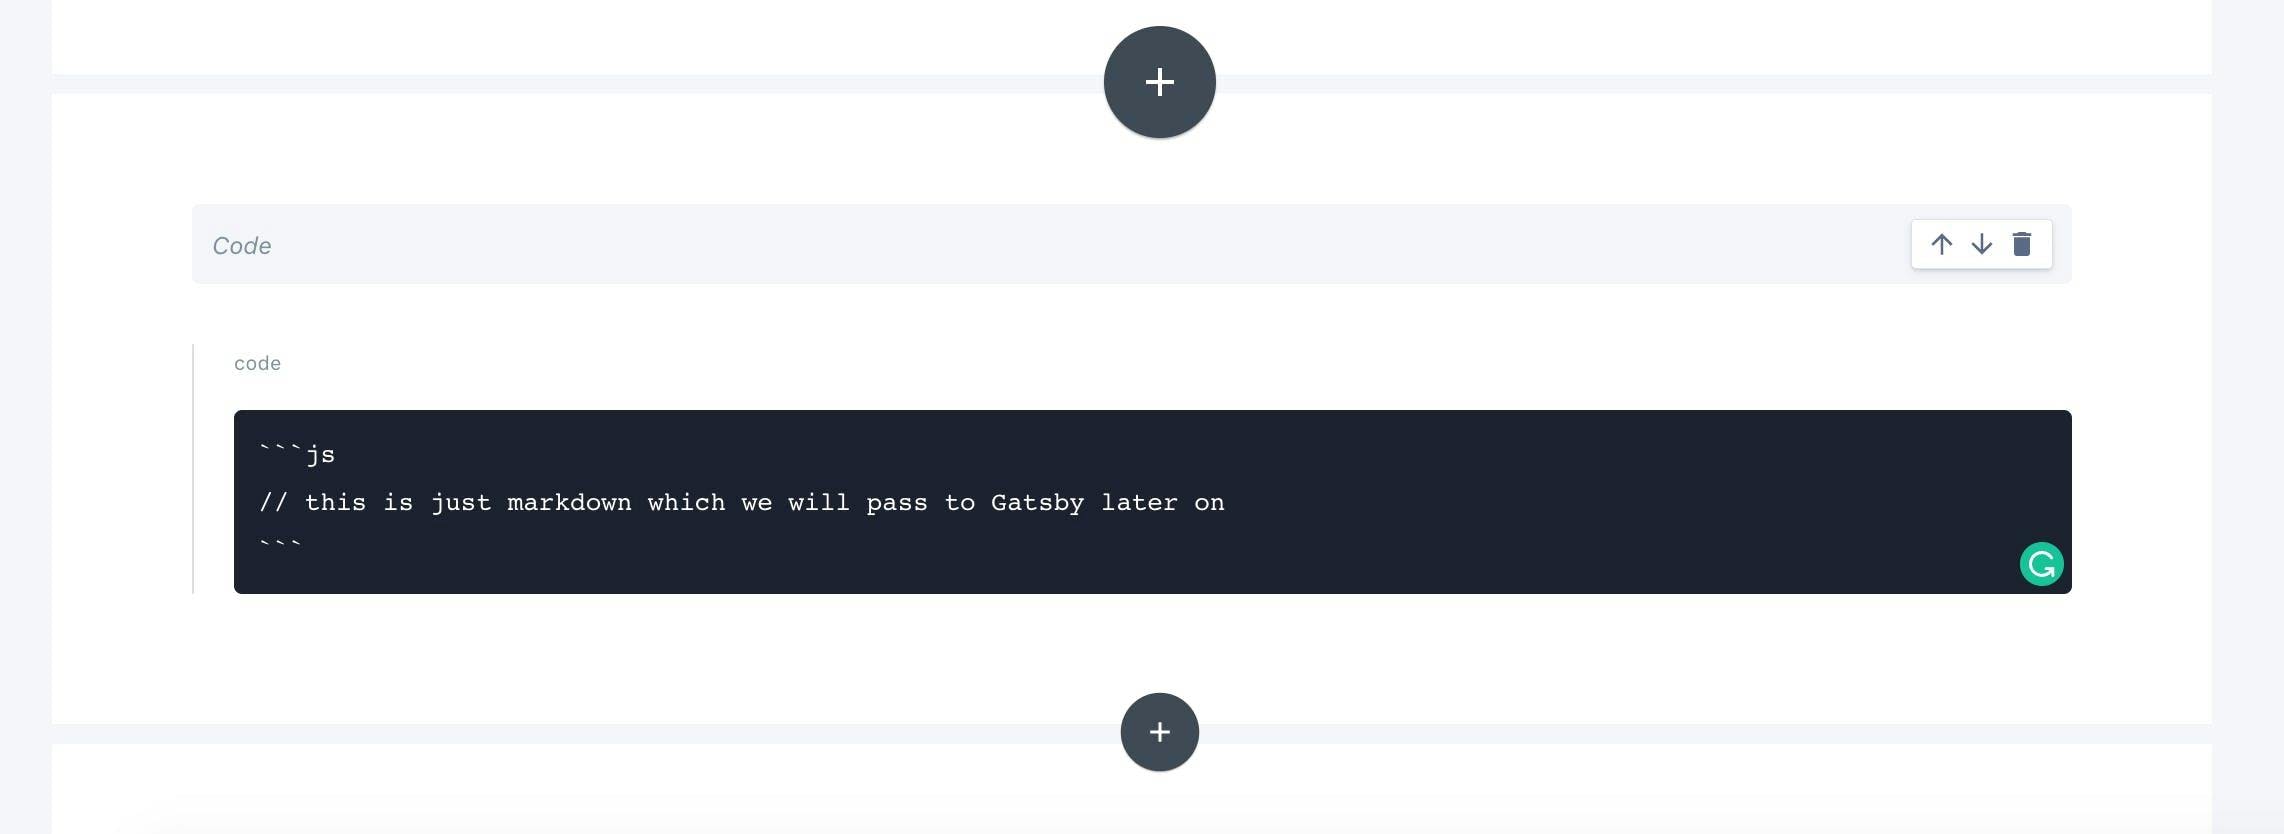
Then within an Article content page, you can then paste code by wrapping it with```and the language you want to use for this snippet, for example,```js for Javascript as you can see in the example below.
Step 2: Add the newly created slice within your article GraphQL query
Now that you have created an article and added code snippet, let's move to our Gatsby app and import the newly created slice.
Note: I am using gatsby-source-prismic-graphql plugin to query the data using GraphQL API. Your query might look different if you are fetching the data using Prismic's REST API.
You should add the PRISMIC_ArticleBodyCode within the body scope of your query.
... on PRISMIC_ArticleBodyCode {
  type
  label
  primary {
    code
  }
}
The whole query looks something like this (omitting other slices and fields).
// article.js

export const query = graphql`
  query ArticleQuery($id: String) {
    prismic {
      allArticles(id: $id) {
        edges {
          node {
            _meta {
              id
            }
            body {
              ... on PRISMIC_ArticleBodyCode {
                type
                label
                primary {
                  code
                }
              }
            }
          }
        }
      }
    }
  }
`
Instead of copying my code, you should head over to http://localhost:8000/___graphql and generate the query yourself.
Step 3: Create a SliceZone component
Let's spend a moment to discuss how to structure your Gatsby application in order to make it a better fit with Prismic.
Since you might have multiple Slices within your Prismic repo, you could extract the logic into a self-contained component which then renders the relevant component based on the data provided to SliceZone.
You only have one Slice for now, but you can extend the component by adding more cases to your switch statement.
We will create the CodeSlice in the next step.
import React from "react"
import CodeSlice from "./code"

const SliceZone = ({ body }) => {
  return (
    <>
      {body &&
        body.map((bodyContent, i) => {
          switch (bodyContent.type) {
            case "code":
              return (
                <CodeSlice key={i} content={bodyContent.primary.code} />
              )
            default:
              return null
          }
        })}
    </>
  )
}

export default SliceZone
In your article template (in my app, I've named it article.js), import SliceZone and render it. Body is the only prop that is passed to SliceZone. It contains all slices that have been passed from Prismic. We can find the slices within props.data.prismic.allArticles.edges[0].node.body
const Article = props => {
  const article = props.data.prismic.allArticles.edges[0].node
  const slices = article.body
  return(
    <>
      ...
      <SliceZone body={slices} />
      ...
    </>
  )
}
Step 4: Create the CodeSlice component
You need to install two packages, react-markdown and prismic-reactjs.
You will use prismic-reactjs to convert your Rich Text data into a plain text and then react-markdown to convert the plain text into formatted output.
import React, { useEffect } from "react"
import Markdown from "react-markdown"
import { RichText } from "prismic-reactjs"

const CodeSlice = ({ content }) => {
  const rawMarkdown = RichText.asText(content)

  return (
    <>
      <Markdown source={rawMarkdown} />
    </>
  )
}

export default CodeSlice
If you prefer to write your articles in markdown instead of Rich Text, you can do it with Prismic using the component above.
Step 5: Configure PrismJS using the gatsby-remark-prismjs plugin
Install PrismJS using gatsby-remark-prismjs:
yarn add gatsby-transformer-remark gatsby-remark-prismjs prismjs
You should update gatsby-config.js in order to add the plugin within your Gatsby app.
{
  resolve: `gatsby-transformer-remark`,
  options: {
    plugins: [
      {
        resolve: `gatsby-remark-prismjs`,
      },
    ],
  },
},
You can read the documentation if you need to add any extra config options, but for this use-case, this config is sufficient.
Next, go to the CodeSlice, import Prism and then call it within a useEffect hook.
import React, { useEffect } from "react"
...

const CodeSlice = ({ content }) => {
  useEffect(() => {
    // call the highlightAll() function to style our code blocks
    Prism.highlightAll()
  })

...
Prism.highlightAll() is the most high level function in the Prism library - it fetches all elements that have a class .language-xxx and then calls Prism.highlightElement() on each of those elements.
Call this function within the useEffect hook, which in this case replaces the ComponentDidMount lifecycle method - it's called whenever the component is loaded onto the DOM.
Step 6: Choose a Prism theme and import the languages you will use
Currently, there isn't a Prism theme configured, therefore the code will not be highlighted. Head over to prism-themes and choose the theme that is right for you.
Create a file src/stylesheets/prism-theme.css and copy the theme's CSS from Github. You can then import the file in gatsby-browser.js.
// gatsby-browser.js

import "./src/stylesheets/prism-theme.css"
There is one more step that took me several hours to figure out.
By default, Prism only imports the default javascript code for highlighting languages such as Javascript and HTML. If you want to include more languages, you need to do it yourself by importing the relevant files within the CodeSlice component.
For example, I sometimes write about bash, ruby and erb, so I had to include these languages.
// CodeSlice.js

import "prismjs/components/prism-markup-templating.js"
import "prismjs/components/prism-ruby.js"
import "prismjs/components/prism-bash.js"
import "prismjs/components/prism-erb.js"